Preamble
I don’t like Google Drive; something about storing my personal files on an advertising company’s servers makes me uncomfortable. Moreover, why should I pay $14 CAD per month for 2 TB of storage while I already have 5+ TB of drives collecting dust ($0 per month)?
This is where Nextcloud comes in. Nextcloud is the FOSS file storage / management system that I mentioned in part 0; it’s something like a self-hosted Google Drive with similar bells and whistles. I don’t need or particularly care for the bells and whistles, but since they’re available, maybe I’ll make some noise.
Setup
Like part 3, I will be configuring this service as a user container using Podman. I used the manual version of the Nextcloud image (as opposed to the All-in-One version) because I don’t want anything fancy, just simple file management. Also, I’d rather do it myself, if possible.
Step 1: Acquire the necessary images
Apart from the main Nextcloud container, two additional containers, while not necessary, are recommended to improve the performance of Nextcloud. The first is an external database and the second is in-memory storage which will be used as a cache.
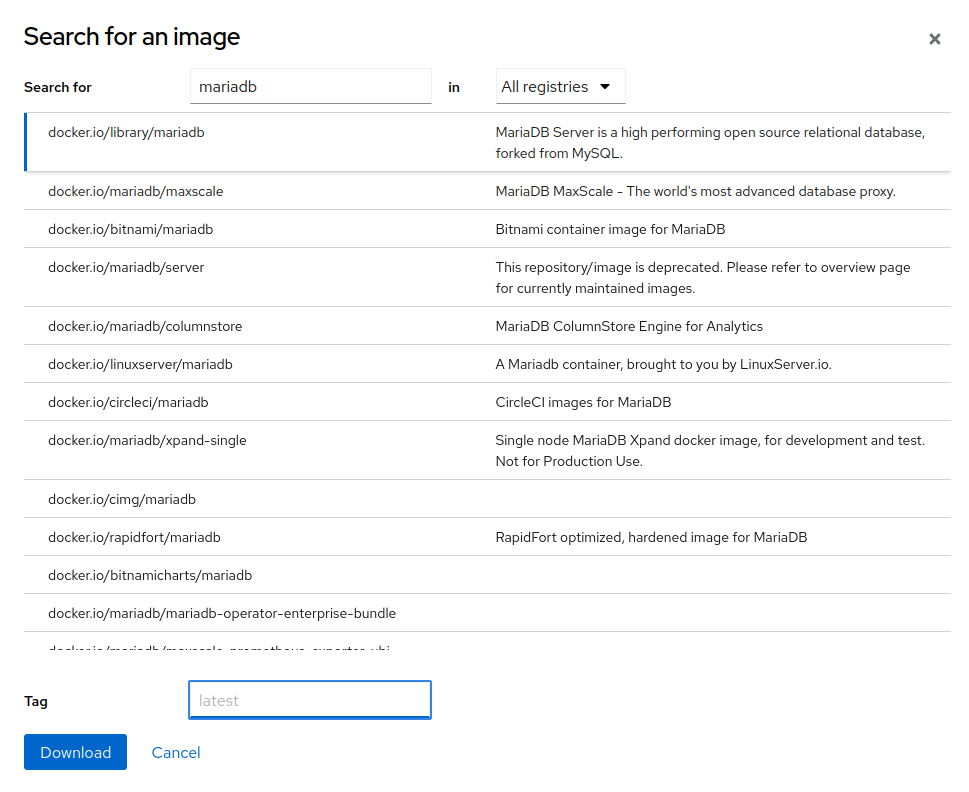
While Nextcloud comes with a SQLite database by default, it’s simply too lite for most loads; heavy-hitters like MySQL/MariaDB or PostgreSQL are much more suitable. Since I’ve used PostgreSQL in the past, I decided to branch out and try MariaDB for a change. MariaDB is emphasized in the documentation, though setup with PostgreSQL should be nearly identical.
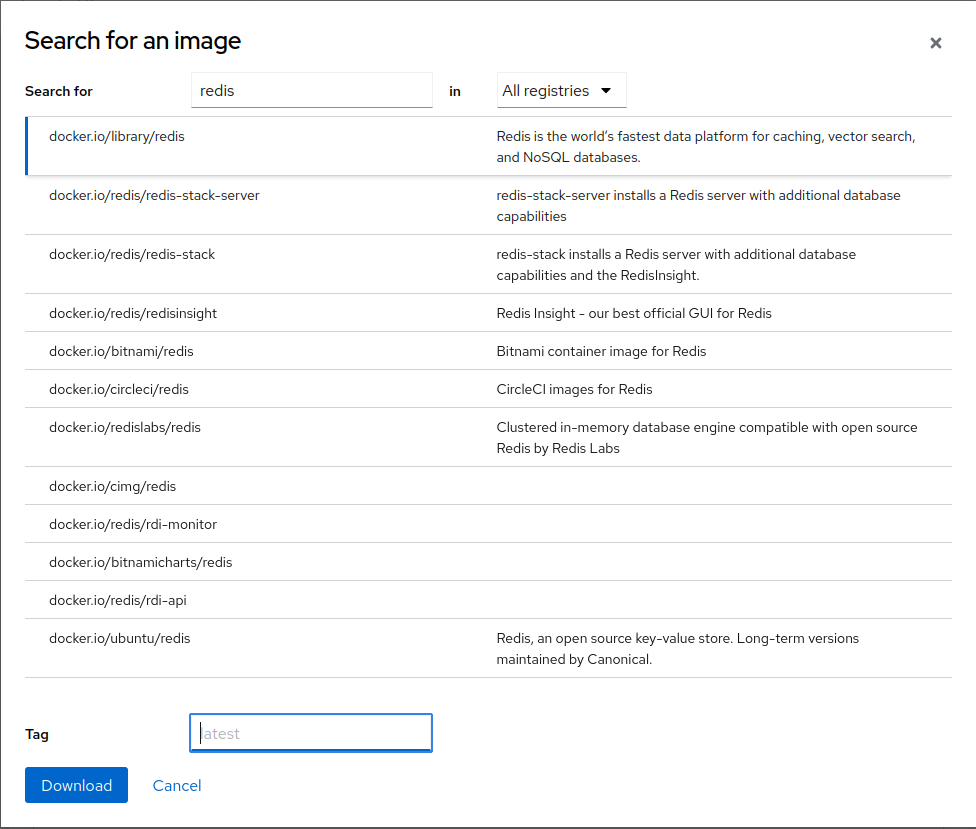
As for in-memory storage, Redis is usually the first that comes to mind (for me, at least). This also appears to be the case with the Redis team! That is, Redis is the only “option” mentioned (on the Docker Hub page, at least). More options are given on the official docs.
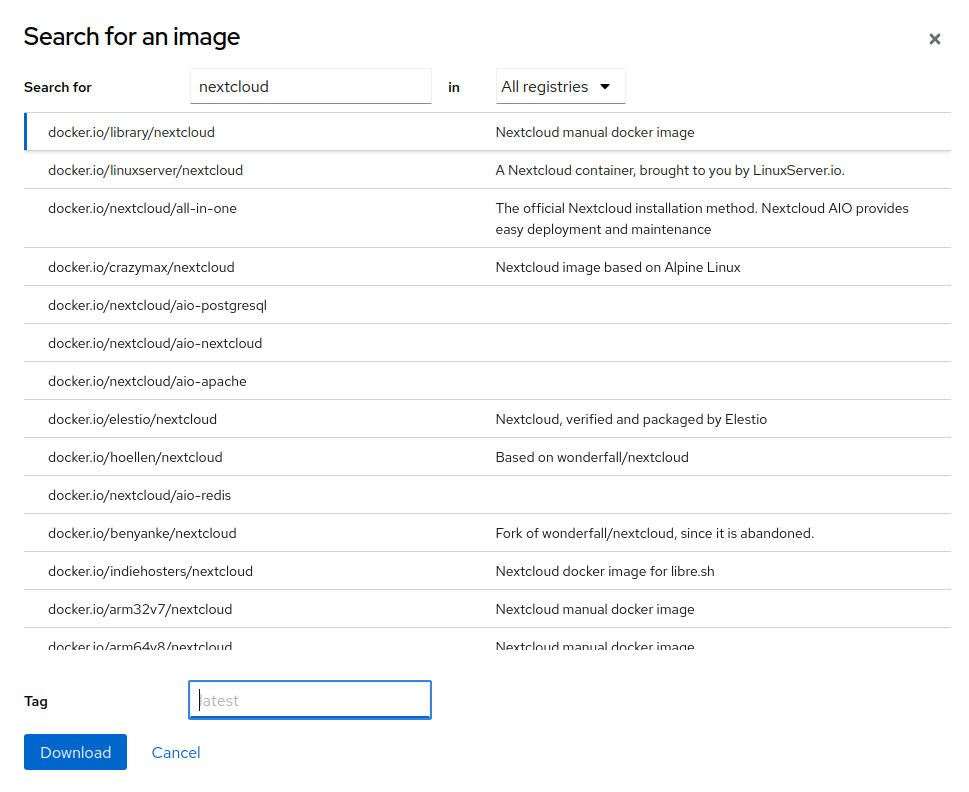
So we need three images:
- Nextcloud
- MariaDB (or PostgreSQL if you chose that route)
- Redis
While not necessary, I chose to pull a specific version of each image (30.0, 11.5.2, and 7.4-alpine,respectively).
Using Podman CLI
podman pull docker.io/library/nextcloud:<tag>
podman pull docker.io/library/mariadb:<tag>
podman pull docker.io/library/redis:<tag>
Using Cockpit GUI

1. Nextcloud
2. MariaDB
3. Redis
Step 2: Create the necessary volumes
The nextcloud container provides 5 directories that can be mounted as volumes:
/var/www/html: Main folder, needed for updating/var/www/html/custom_apps: Installed / modified apps/var/www/html/config: Local configuration/var/www/html/data: The actual data of your Nextcloud/var/www/html/themes/<YOUR_CUSTOM_THEME>: Theming/branding
/var/www/htmlholds all of the uploaded data. I mounted it to a local directory on a 2 TB SSD as opposed to in a regular volume.
The database stores file indexing information, which should be mounted to a volume. For MySQL/MariaDB, this is /var/lib/mysql; while for PostgreSQL, this is /var/lib/postgresql/data.
The database volume can be created like so:
podman volume create nextcloud-dbCockpit doesn’t reference volume names directly, and instead requires the location of the volume on disk. This should be /home/$USER/.local/share/containers/storage/volumes/nextcloud-db.
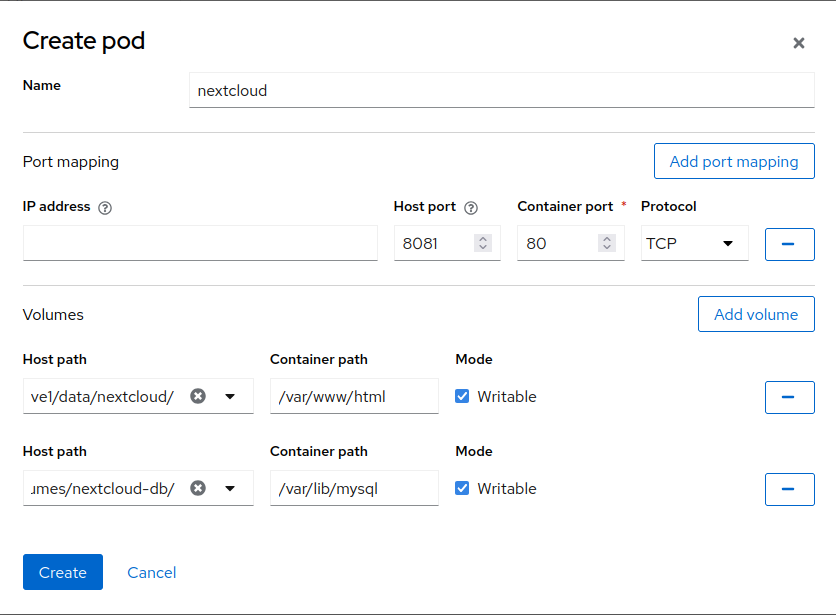
Step 3: Create a pod
Since the Nextcloud, MariaDB, and Redis containers must communicate with one another, it’s best to group them in a pod. This will look something like:
Breakdown
- The pod is named
nextcloud - Port mappings for the containers are specified ahead of time. In this case, port
8081on the host is mapped to80in the container - The main folder
/var/www/htmlis mounted to a local directory where I want the data to persist. This is on a 2 TB SSD for now - The database
/var/lib/mysqlis mounted to the volumenextcloud-dbcreated earlier, which is located at/home/$USER/.local/share/containers/storage/volumes/nextcloud-db/
Note
The following containers should be created in the order given
Step 4: Create the MariaDB container
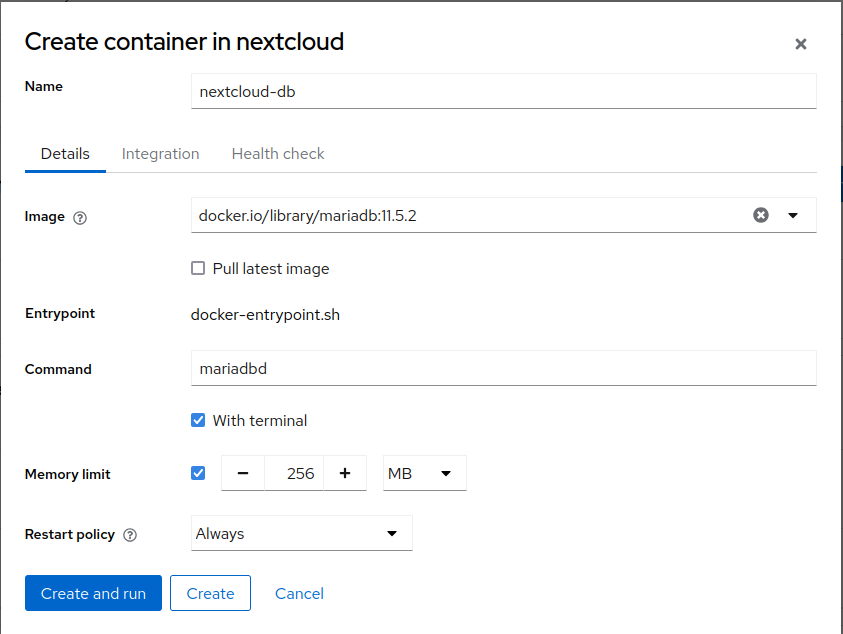
Breakdown
- The container is named
nextcloud-db - A memory limit of 256 MB is applied to the container
- The restart policy is set to “Always” so the container always restarts, should it stop unexpectedly
- Volume mappings are skipped since they will be handled by the pod
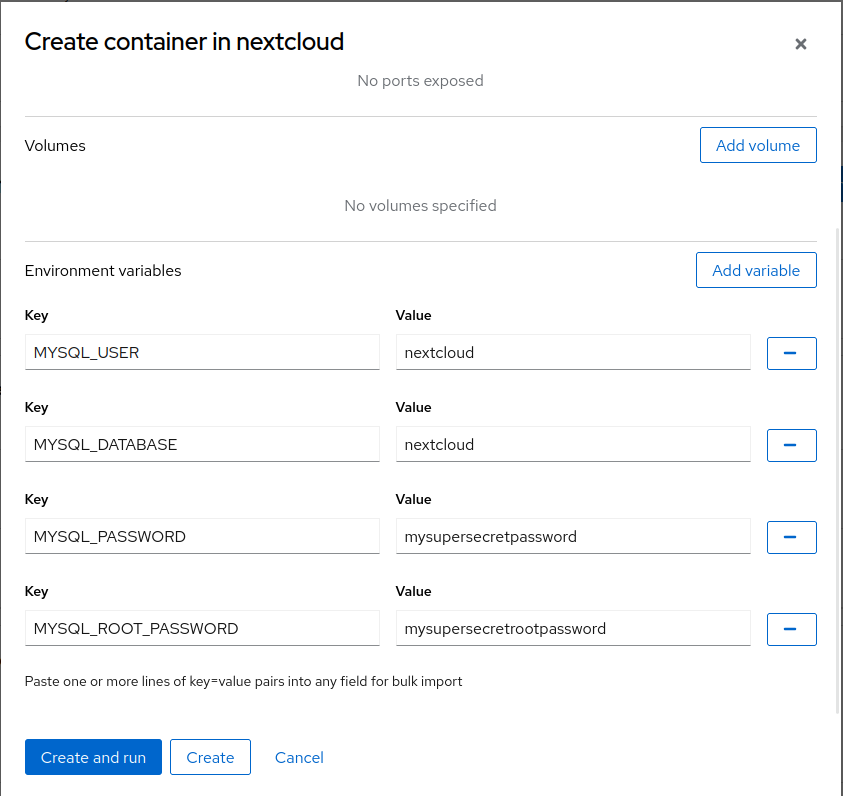
- Instead of manually configuring the DB, environment variables are used to pass configurations in
MYSQL_USER: The name for the userMYSQL_DATABASE: The name of the databaseMYSQL_PASSWORD: The password for the userMYSQL_ROOT_PASSWORD: The root password
Note
Remember
MYSQL_USER,MYSQL_DATABASE, andMYSQL_PASSWORD, they will be used in step 6
Step 5: Create the Redis container
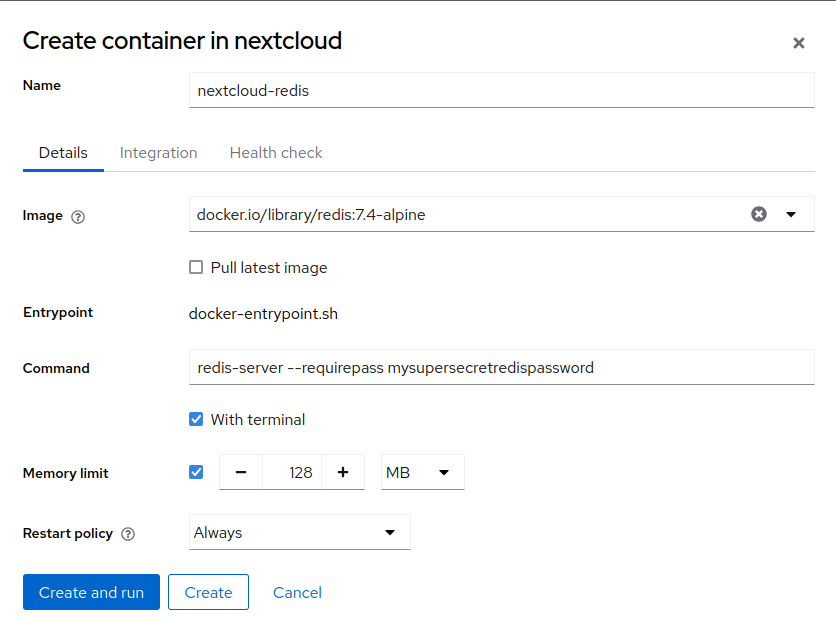
Breakdown
- The container is named
nextcloud-redis - In the command field, the parameter
--requirepassis used to set a default password. The password itself can be wrapped in double quotes (i.e.--requirepass "mysupersecretredispassword") if needed1 - A memory limit of 128 MB is applied to the container
- The restart policy is set to “Always” so the container always restarts, should it stop unexpectedly
Note
Remember your Redis password, it will be used in step 6
Step 6: Create the Nextcloud container
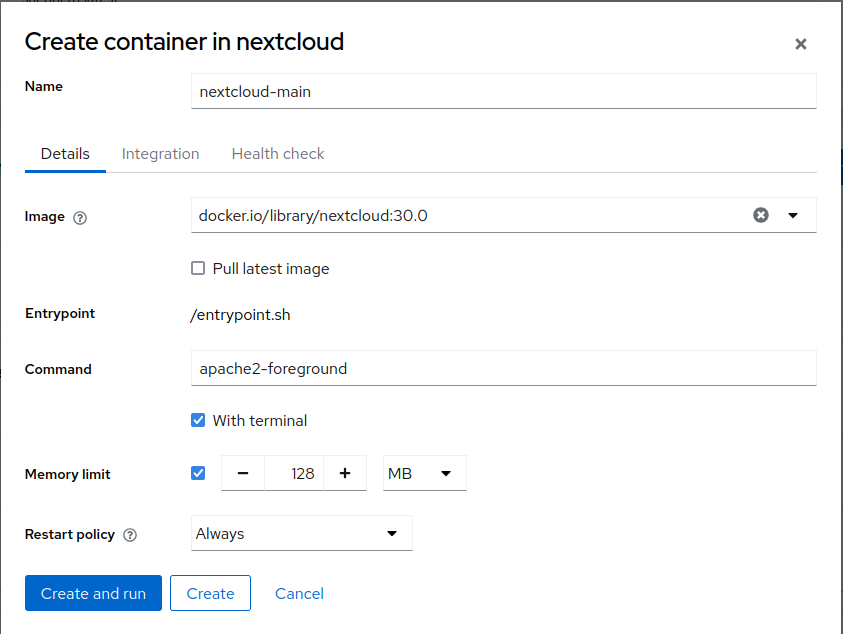
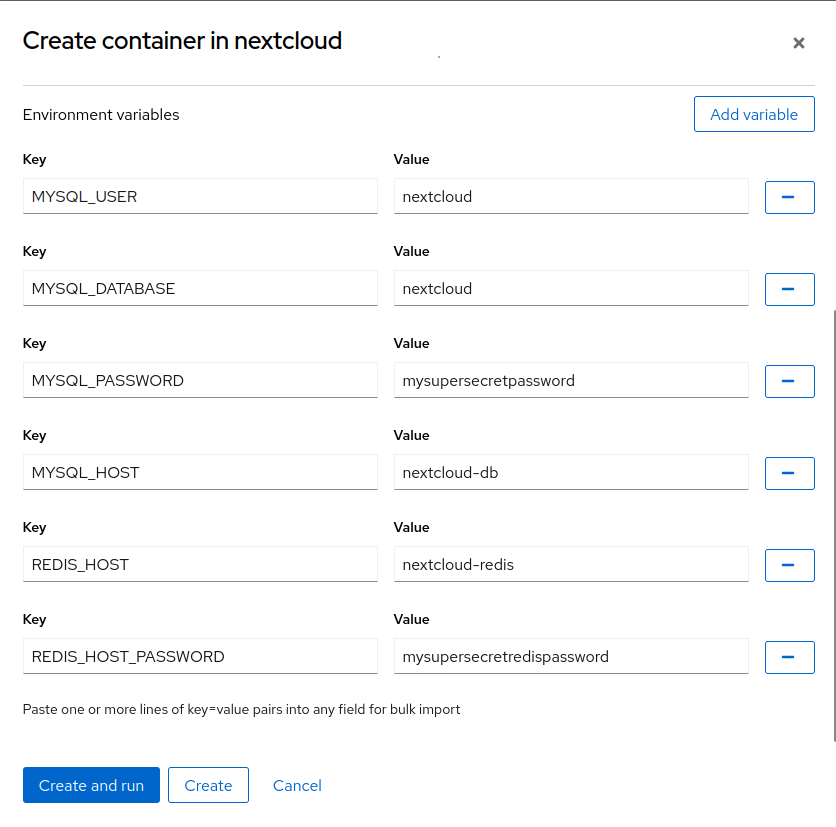
Breakdown
- The container is named
nextcloud-main - A memory limit of 128 MB is applied to the container.
- Edit: According to the system requirements, this is the absolute minimum, but the Nextcloud teams suggests at least 512 MB per process. The AIO wiki additionally recommends at least 1 GB per active user.
- The restart policy is set to “Always” so the container always restarts, should it stop unexpectedly
- Port and volume mappings are skipped since they will be handled by the pod
- Instead of manually configuring the DB, environment variables are used to pass configurations in. Nextcloud will automatically configure the database and Redis connections using these values
MYSQL_USER: Same as earlierMYSQL_DATABASE: Same as earlierMYSQL_PASSWORD: Same as earlierMYSQL_HOST: The name of the container running the database;nextcloud-dbin my caseREDIS_HOST: The name of the container running Redis;nextcloud-redisin my caseREDIS_HOST_PASSWORD: Same as the password passed with the--requirepassargument earlierNEXTCLOUD_ADMIN_USER(Optional): Preset an admin usernameNEXTCLOUD_ADMIN_PASSWORD(Optional): Preset an admin password
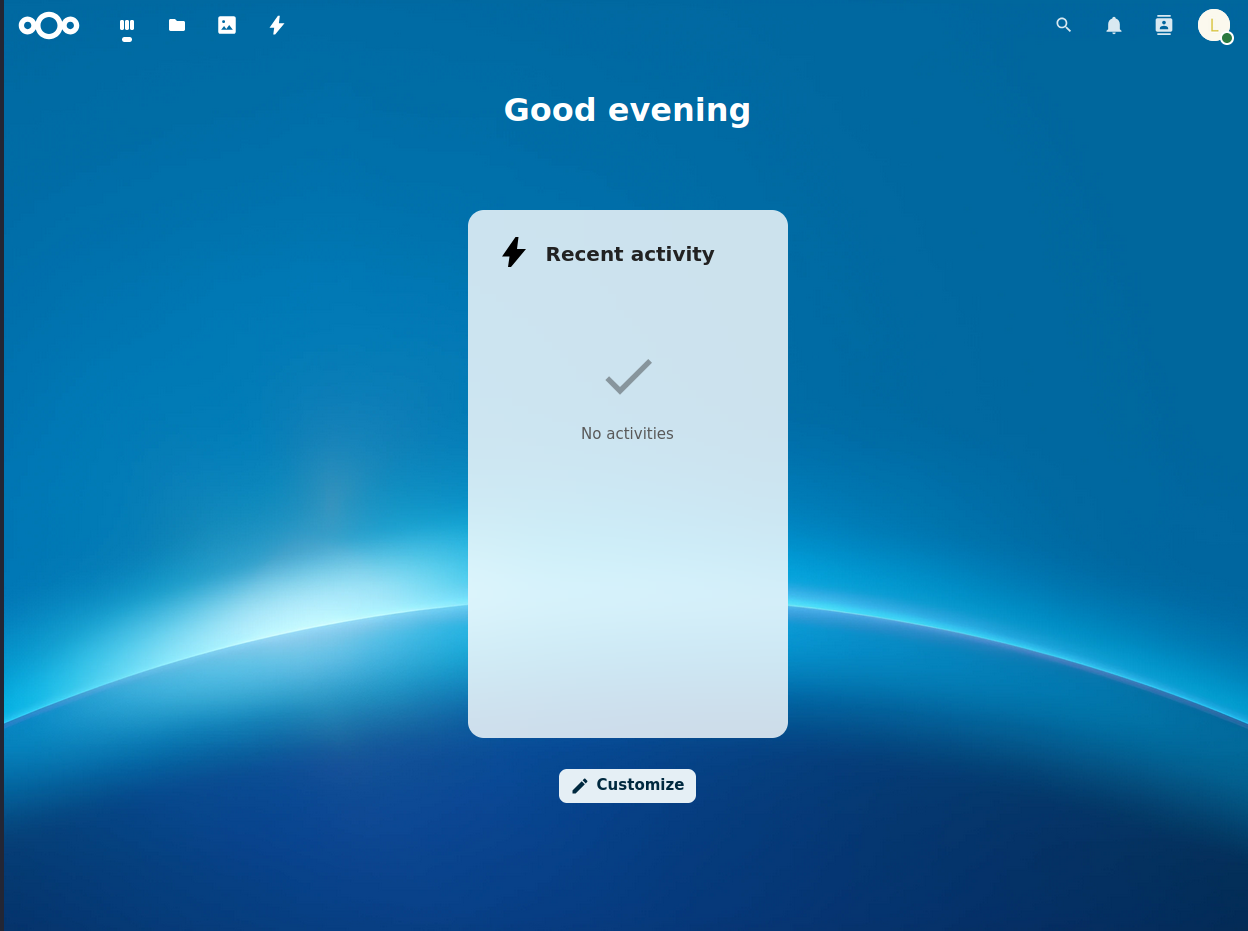
Step 7: Open the Nextcloud UI
For me, this is running on port 8081, so navigating to <hostname>:8081 brings up the Nextcloud login page. If you didn’t set the NEXTCLOUD_ADMIN_* environment variables, you will be asked to create a new admin account now. I forgot to take a screenshot of this part so just trust me. If everything is configured correctly, after login you should be redirected to the dashboard which, for me, looks like:
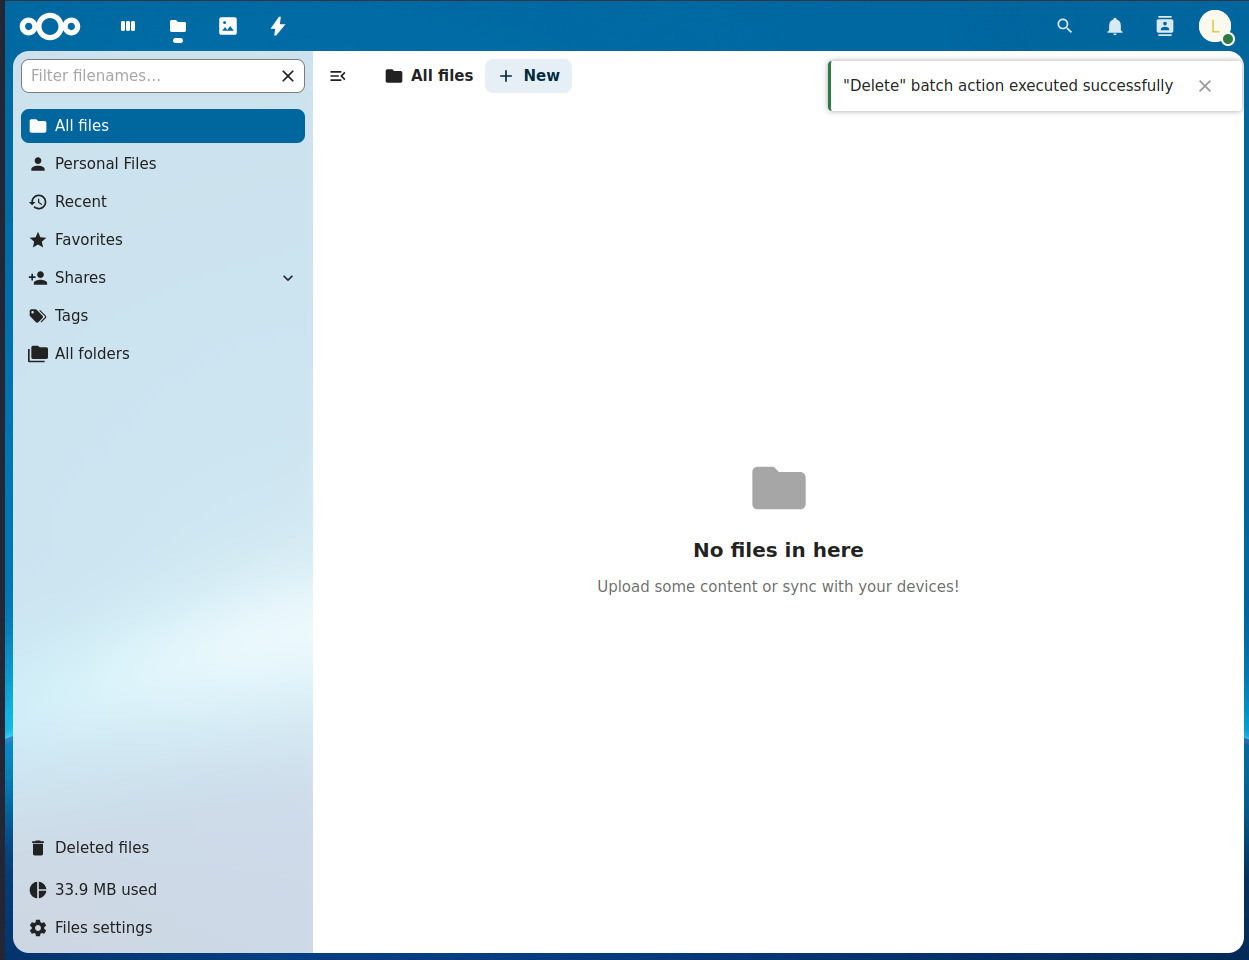
Navigating to the “Files” page will reveal a bunch of guides and sample files, which I deleted immediately without reading.
Note
If you didn’t configure Redis and try deleting the default files, you’ll notice that two files are locked:
Readme.mdandTemplates credits.md
Step 8: Using Nextcloud
The first thing I added was a small collection of silly tech memes that I had kicking around:
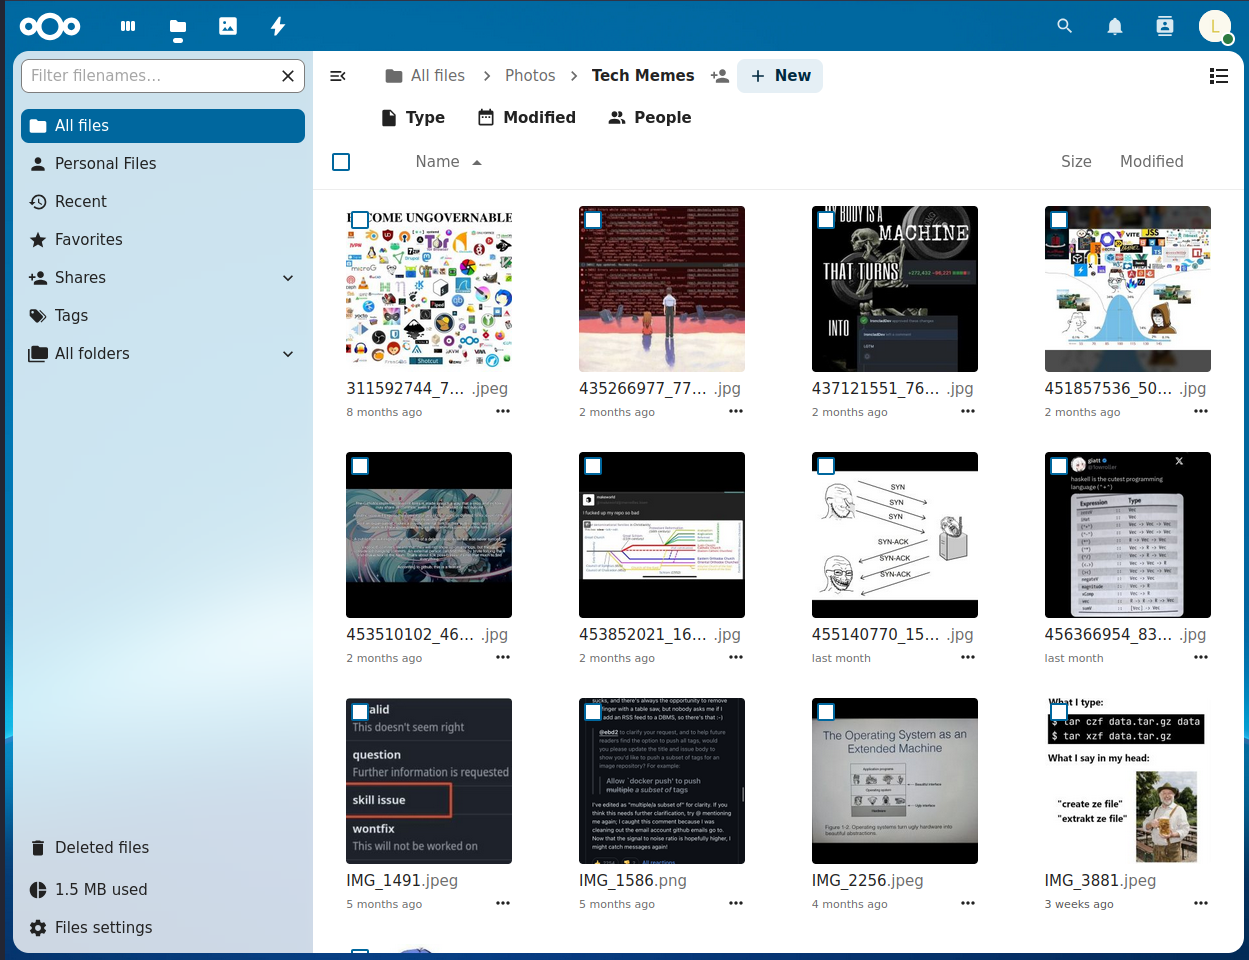
The next thing I did was employ Google Takeout to export my entire Google Drive as one big .tgz (which I know how to extract thanks to IMG.3881.jpeg shown above!). For nearly 8 years, I’ve stored most of my photography on Google Drive, so this archive is quite large. Fortunately, it’s mostly organized (by years > months > events), so uploading everything to Nextcloud won’t be too painful.
Update
While Nextcloud works, it is slow. Very slow. Here’s what I tried to change that:
- Use Redis (originally I only used Nextcloud and MariaDB)
- Downscale preview quality by 50%
- Install the Preview Generator app
- Configure cron jobs
- Increase container memory limits
Preview Generator App
I configured the preview generator app according to this since the docs did not seem very useful. As instructed in the docs, I ran ./occ preview:generate-all -vvv and found that it only tries the first folder in my drive before giving up. I then tried preview:pre-generate, which had the same result. These are known issues that have been reported many times over the years2345 with no indication of being fixed anytime soon.
Cron Jobs
Another thing that I found bizarre is that Nextcloud recommends cron for background jobs, but cron is not the default option …? Here’s a slightly hilarious excerpt from the documentation:
The AJAX scheduling method is the default option. Unfortunately, however, it is also the least reliable.
Shouldn’t defaults be sensible? It seems nonsensical to default to the worst option, though they do elaborate that AJAX is the default because it “does not require access to the system nor registration with a third-party service”.
What I don’t understand is why they require either of those things when they can just run cron jobs in the container? This is answered by a forum moderator here and here, but I didn’t find these arguments very convincing. To start, the main argument against using cron jobs in the main Nextcloud container is that “the philosophy of the docker is each container does exactly one thing”; however, the main Nextcloud container already does multiple things (i.e. “Nextcloud”, as a product, is comprised of multiple distinct but integral components) and background jobs appear to be an integral component, therefore they should be part of “Nextcloud”. Moreover, a philosophy of containerization far more fundamental than doing “exactly one thing” is in the name: containers should be as isolated (i.e. contained) from the host as possible. The official solution to the cron problem is to run the host system’s cron, an approach that violates the most fundamental aspect of containers. Meanwhile the alternative is simply to redefine exactly what you mean by “Nextcloud” (i.e. expand its scope to include the sensible default).
Rant aside, there is another option that does not violate the principle of containerization: use more containers! For example, a separate cron container can be added that interfaces with the other Nextcloud containers. This option isn’t discussed in the docs, only alluded to in the examples here and here, and mentioned in the forums every once in a while (such as here). I should note that I did not try this solution as I experienced issues running the background jobs directly, let alone indirectly (as one would using a cron container).
I spent a lot of time reading the forums, and not much time making any progress. I couldn’t get cron jobs to work. As suggested in a number of posts, I tried invoking the background jobs directly (which should be added to system cron6) using the following:
podman exec -u www-data nextcloud-main php /var/www/html/cron.phpbut found that Nextcloud literally DoS’d itself in the process. I didn’t get a screenshot of that particular instance, but what follows is one I took shortly beforehand, in which CPU usage skyrockets while (presumably) trying to generate image previews:

Despite letting Nextcloud do it’s thing for a while, it did not appear to generate any new image previews. Just little grey boxes.
Increase Container Memory Limits
Those familiar with Nextcloud’s system requirements may have noticed how little memory I allocated to each container. I referenced the system requirements, as well as these recommendations in the wiki for the AIO repo, and restarted the containers after providing them with ample memory. In retrospect, this should have been the first thing I tried. That being said, after increasing the memory limits, I encountered issues restarting Nextcloud with my existing data, which I decided not to fix.
Giving Up?
At this point, I decided to take a break from trying to fix my Nextcloud setup. Out of curiosity, I looked into alternatives and revisited Seafile, a much simpler and speedier file syncing service. Seafile stores files in chunks as opposed to whole files, which supposedly makes I/O faster, with the caveat of rendering the stored data unusable on its own. This was originally a turnoff for me, but something I decided I could live with if it meant syncing and image previews were fast and didn’t require tons of resources thrown at it.
Summary
In this post, I discussed how to setup Nextcloud using MariaDB and Redis as user containers in Cockpit using Podman.