Background
DNS sinkholes are DNS servers that refuse to translate domain name → IP address for a certain set of domain names. For example, suppose a website instructs a client’s browser to request content from www.eviladvertisementcompany.com, but the DNS sinkhole has blacklisted that domain; the DNS sinkhole will return a non-routable IP address instead of the actual IP address, thereby blocking the content from www.eviladvertisementcompany.com.
Preamble
When I first learned of DNS sinkholes, my mind was blown. Despite taking multiple networking courses and learning about DNS, it hadn’t occurred to me that a DNS server could intentionally misbehave and still be considered useful. But since then, I have been looking forward to setting one up for myself. Here, I go over how I set up of AdGuard Home, a FOSS DNS sinkhole that I mentioned in part 0 of this series.
Setup
AdGuard offers an Alpine-based image over on Docker Hub. The Docker Hub page contains all the relevant documentation necessary to get everything up and running. The setup process is straightforward, but since I did not find any guides online that covered running AdGuard as a user container in Podman, I decided to document the process here in case anyone finds it useful.
Using Podman, there are two paths for deploying an AdGuard container (or any container, really):
- As a system container
- As a user container
Running system containers is far easier, and the setup will be nearly identical to setting up a Docker container. There are already a million guides for this, so I’ll instead focus on user containers.
Info
To deploy AdGuard as a system container, enable admin access in Cockpit, start the system Podman service, then skip to step 1 below
Step 0.a: Unprivileged users vs privileged ports
Warning
This approach has some security implications and is only presented for illustrative purposes.
A better solution, for example, is to bind the container’s DNS ports to unprivileged ports on the host, then use a reverse proxy to direct DNS requests made to the host to those unprivileged ports, which are then handled by the container.
Since AdGuard runs as a DNS server, it requires access DNS ports, such as 53 (plain DNS), 443 (DNS over HTTPS), and 853 (DNS over TLS and DNS over QUIC), depending on configuration. All ports are privileged ports, so any unprivileged user needs permission to use them.
To allow an unprivileged user to use these ports, run the following:
sudo sysctl net.ipv4.ip_unprivileged_port_start=53Step 0.b (Optional): Enable lingering
Warning
The
cockpit-podmanteam does not support or recommend this1
To set a restart policy on user containers, lingering must be enabled2. If this is something you would like, run the following to enable it:
loginctl enable-linger <username>or for the current user,
loginctl enable-linger $USERStep 1: Create the necessary volumes
AdGuard requires two volumes for persistence. Create these with Podman like so:
podman volume create adguard-work
podman volume create adguard-conf
These volumes will be created in /home/$USER/.local/share/containers/storage/volumes.
Note
Note this location, it will be relevant for the next step
Step 2: (Optional) Create a pod
Info
If you skip this step, make sure to set the port mappings and volume mounts on the container in the “Integrations” tab (see step 4)
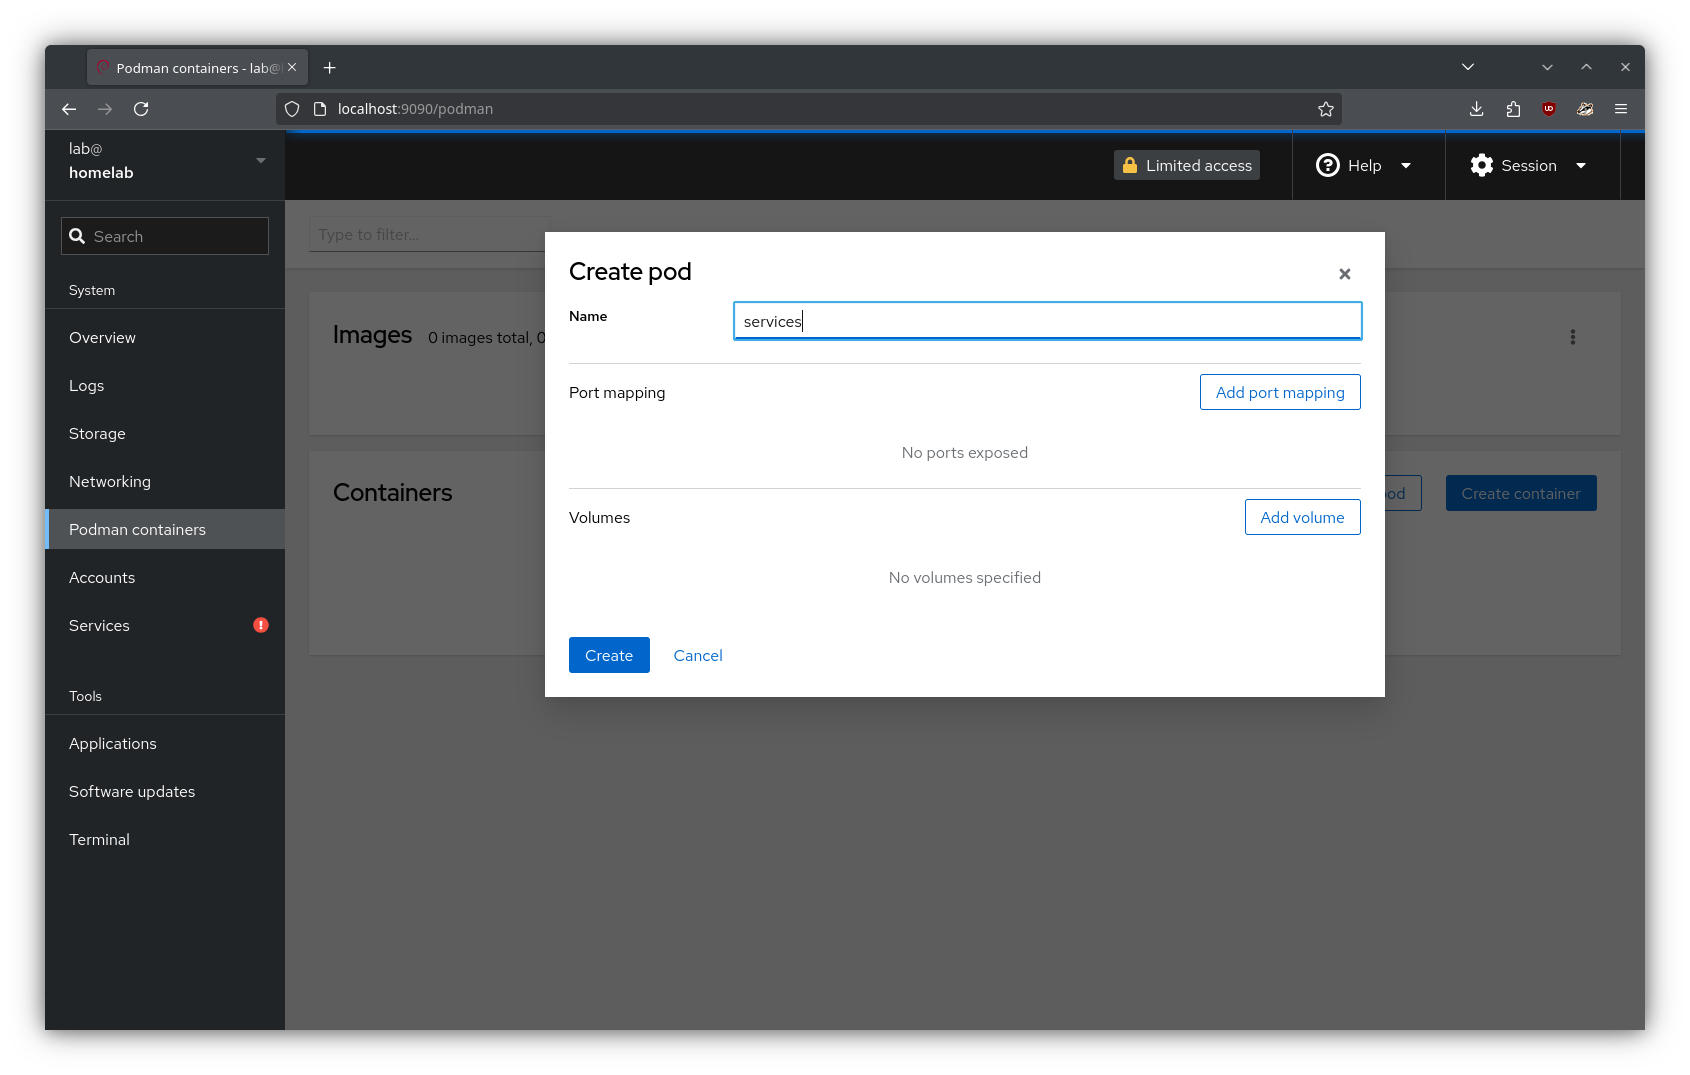
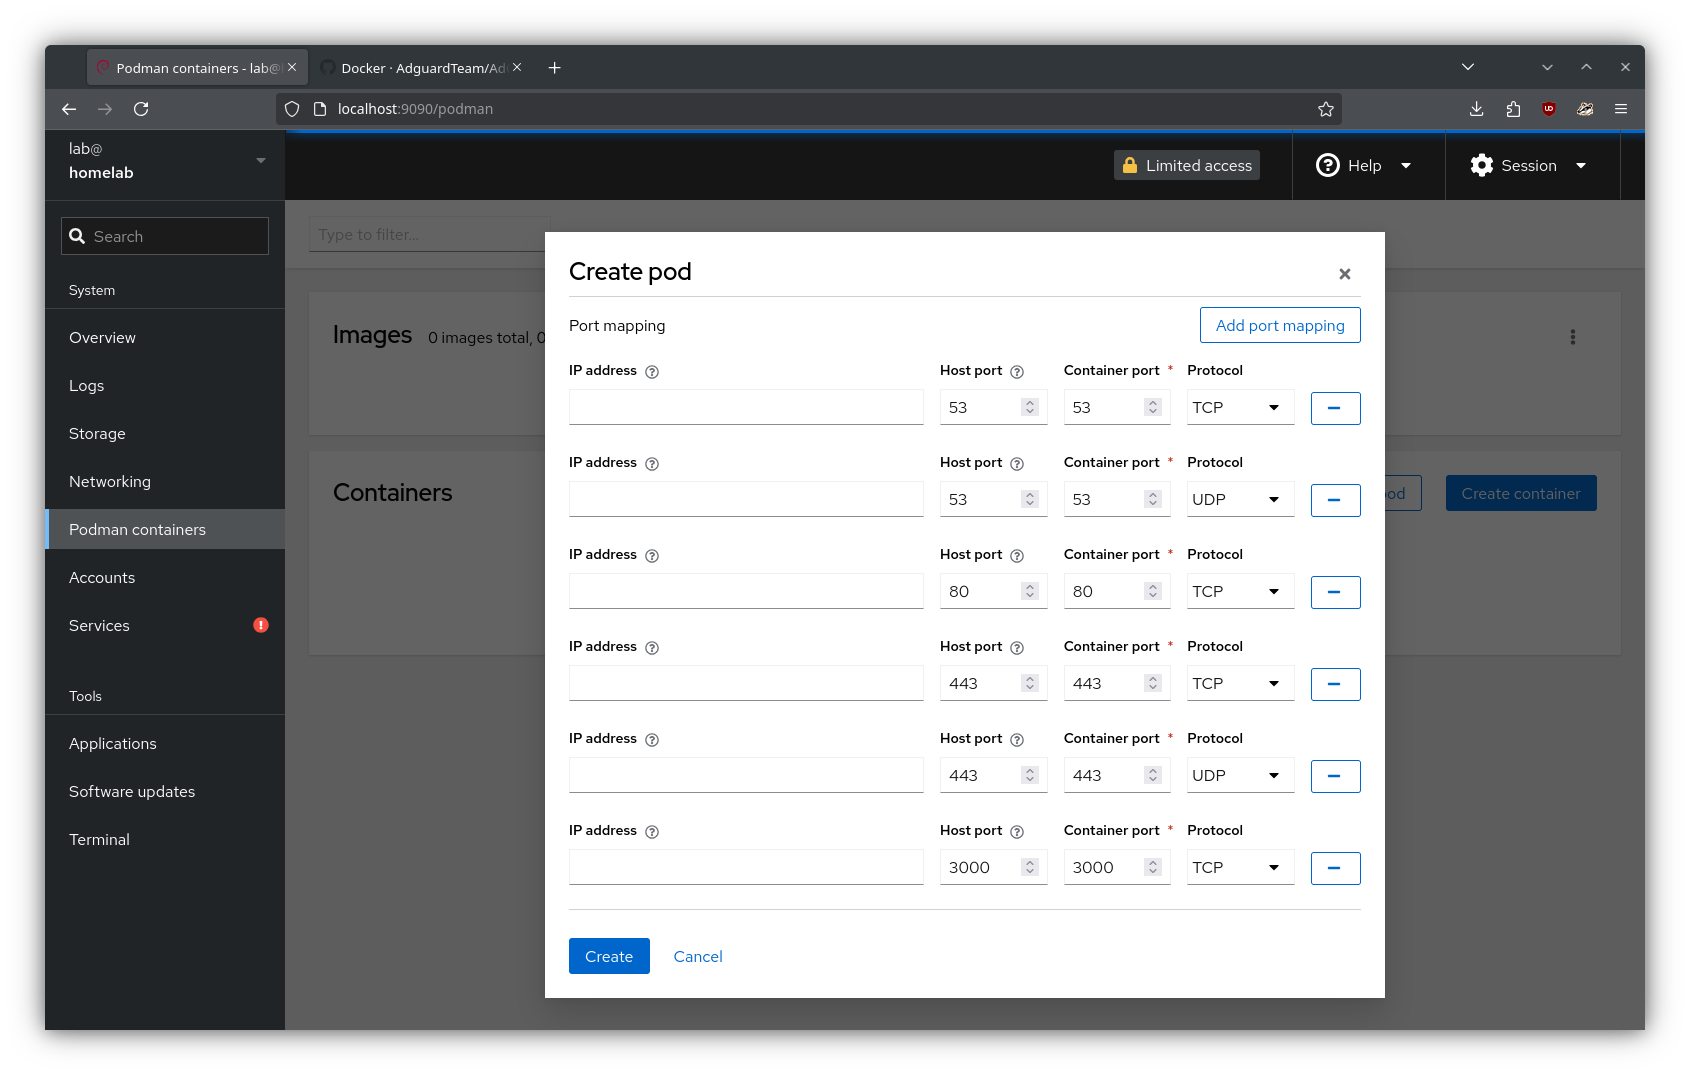
From the “Podman containers” tab in Cockpit, I created a new pod named “services”. Here, I defined the relevant port mappings and volumes for AdGuard (using the volume mounts created in the previous step):
Info
See this for more details about port mappings
Info
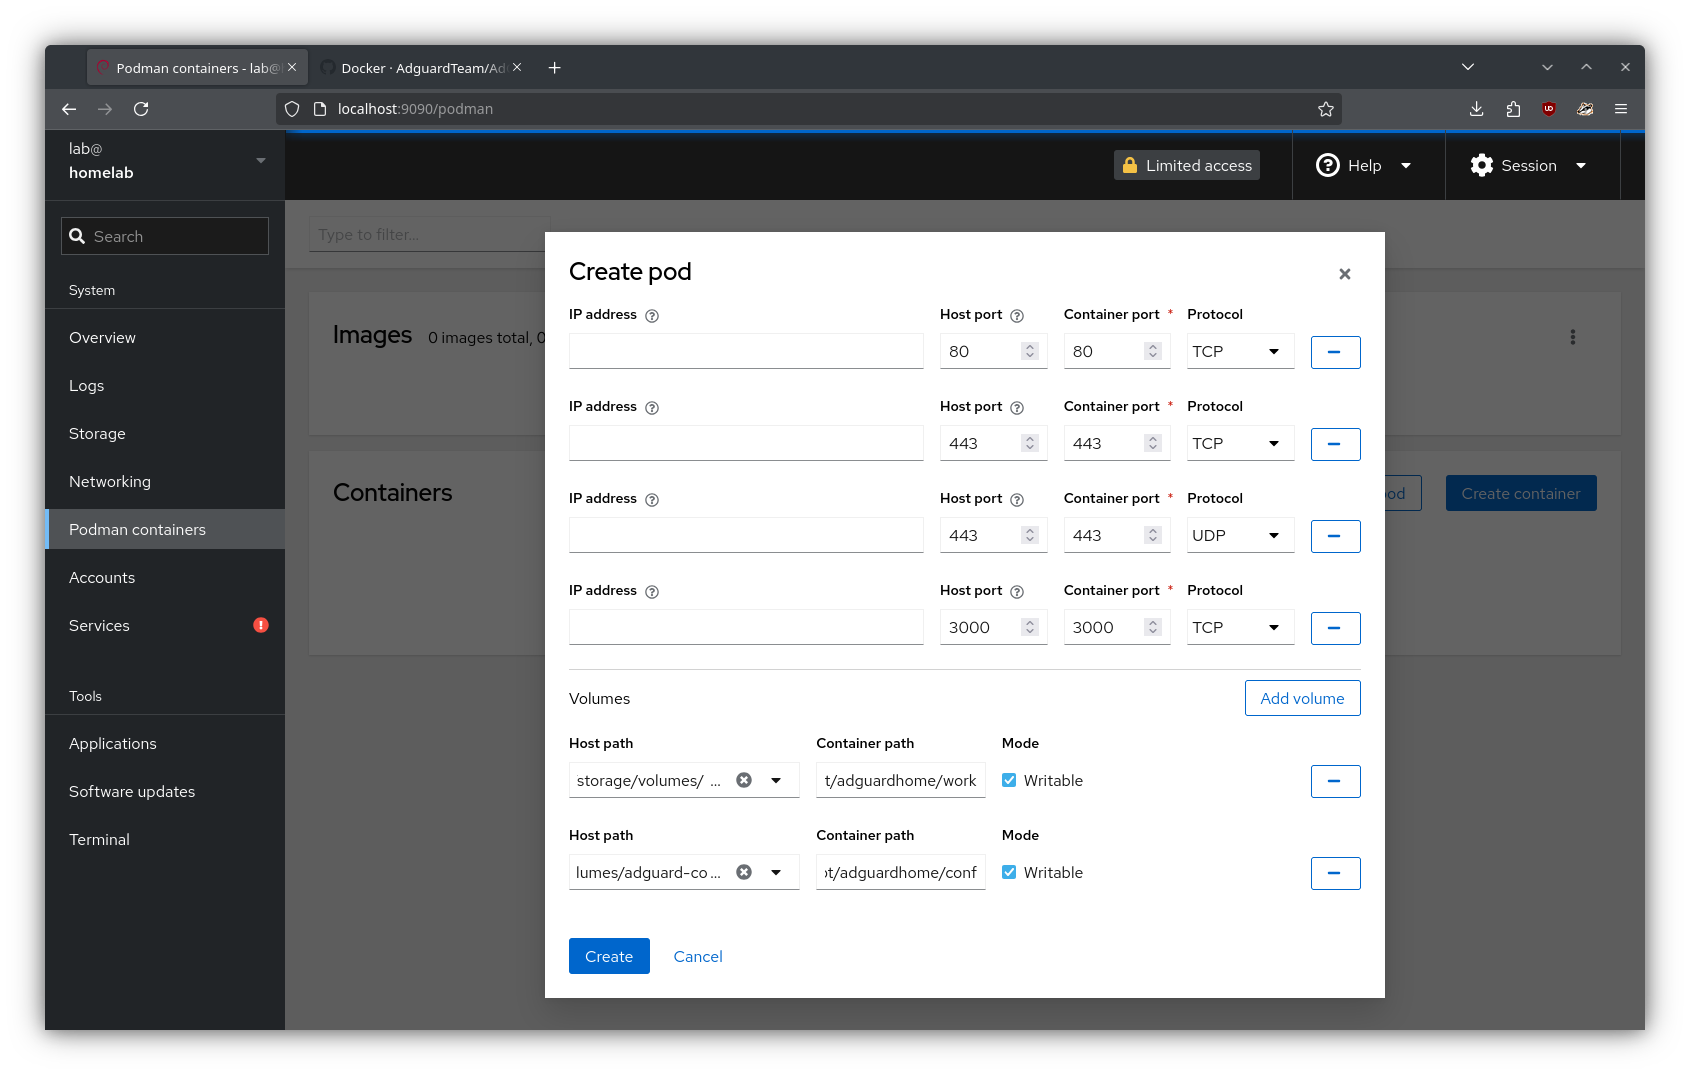
The volumes are mounted like so:
/home/$USER/.local/share/containers/storage/volumes/adguard-work→/opt/adguardhome/work/home/$USER/.local/share/containers/storage/volumes/adguard-conf→/opt/adguardhome/conf
Step 3 (Optional): Pull a specific AdGuard version
In my testing, cockpit-podman refused to fetch a specific image tag in the “Create container” UI, so I first had to download the image directly. There are two ways of doing so:
- Under the “Images” section, select “Download new image” and specify the desired tag on the “Search for an image” popup
- Pull the image using
podman:
podman pull docker.io/adguard/adguardhome:<tag>Once the image is pulled, it will show up in Cockpit.
Step 4: Create the AdGuard container
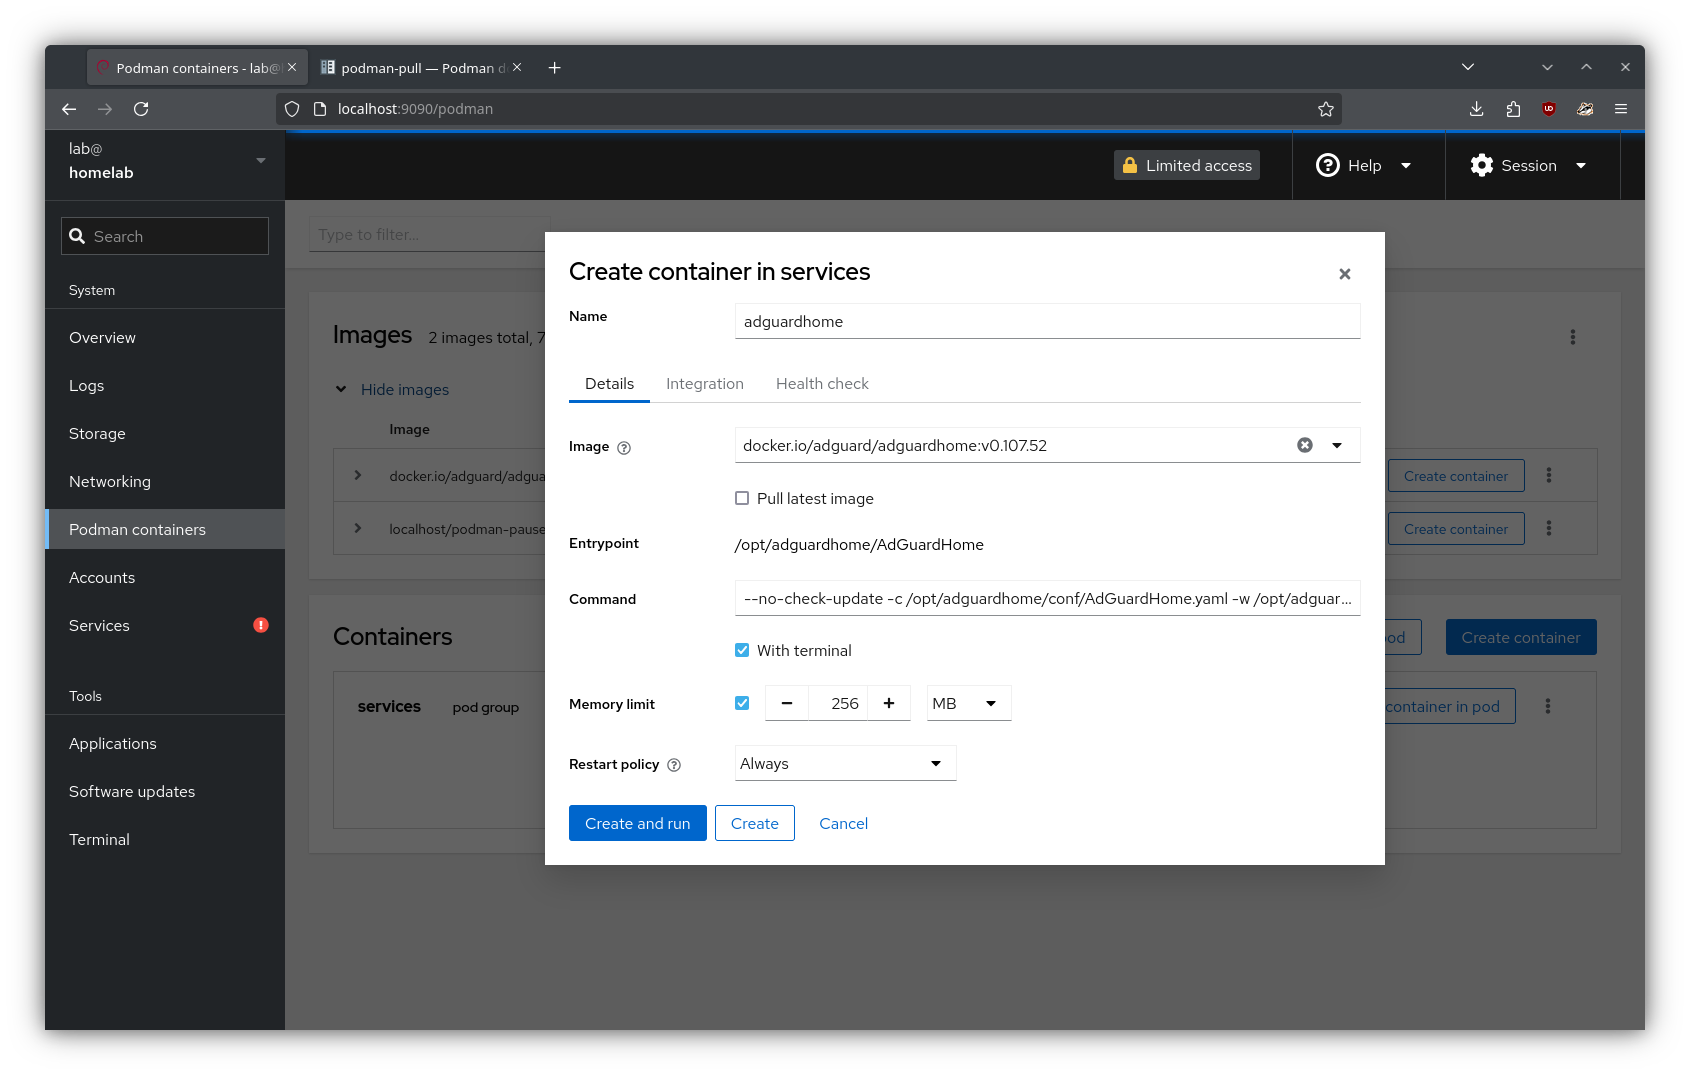
Then, I created a new container in the “services” pod:
Note
In the above screenshot, I completed the optional steps 0.b and 3. If you did not complete step 0.b, the “Restart Policy” option will not be available. If you did not complete step 3, just search for the image in the “Create container” UI to pull the latest version.
If you completed step 2, then no further configuration is necessary; the container will inherit the port mappings and volume mounts from the pod.
If not, define the port mappings and volume mounts listed step 2 in the “Integration” tab here.
Step 5: Run the AdGuard container
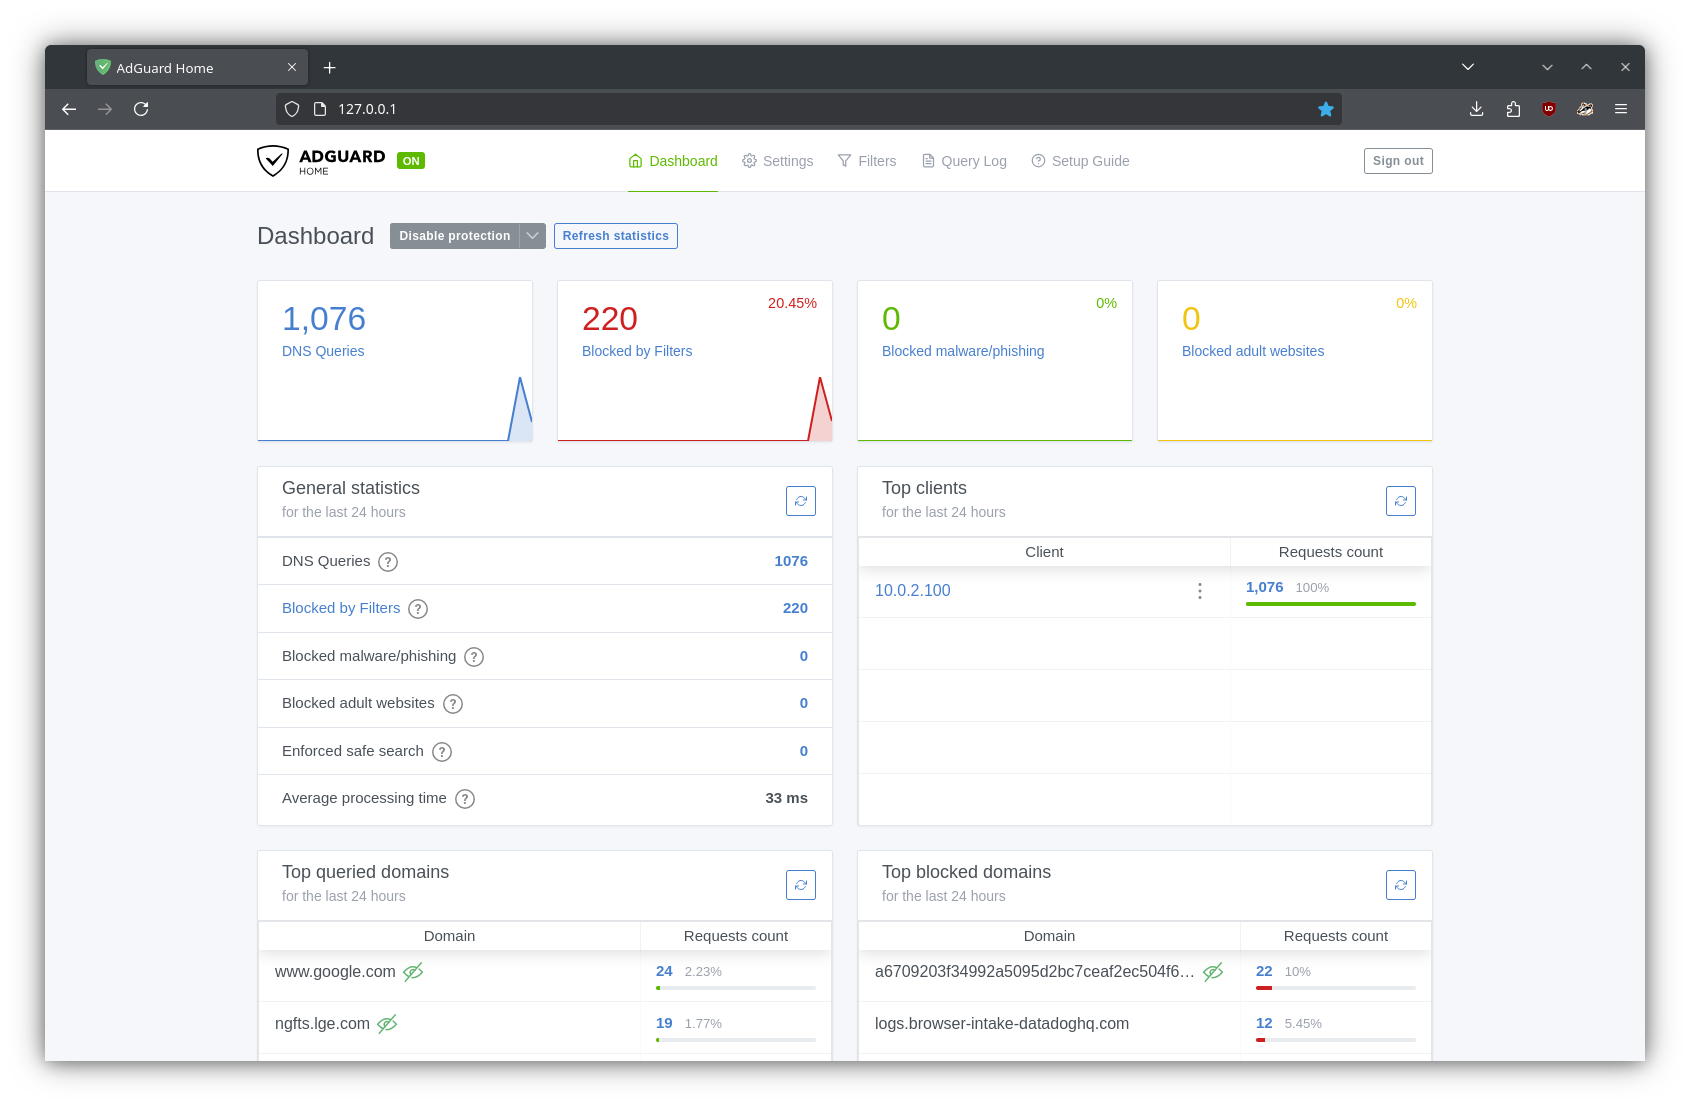
Click “Create and run”, and the container should spin up. The AdGuard UI will be made available at http://127.0.0.1:3000 and looks a little something like this:
Step 6: Configuring AdGuard
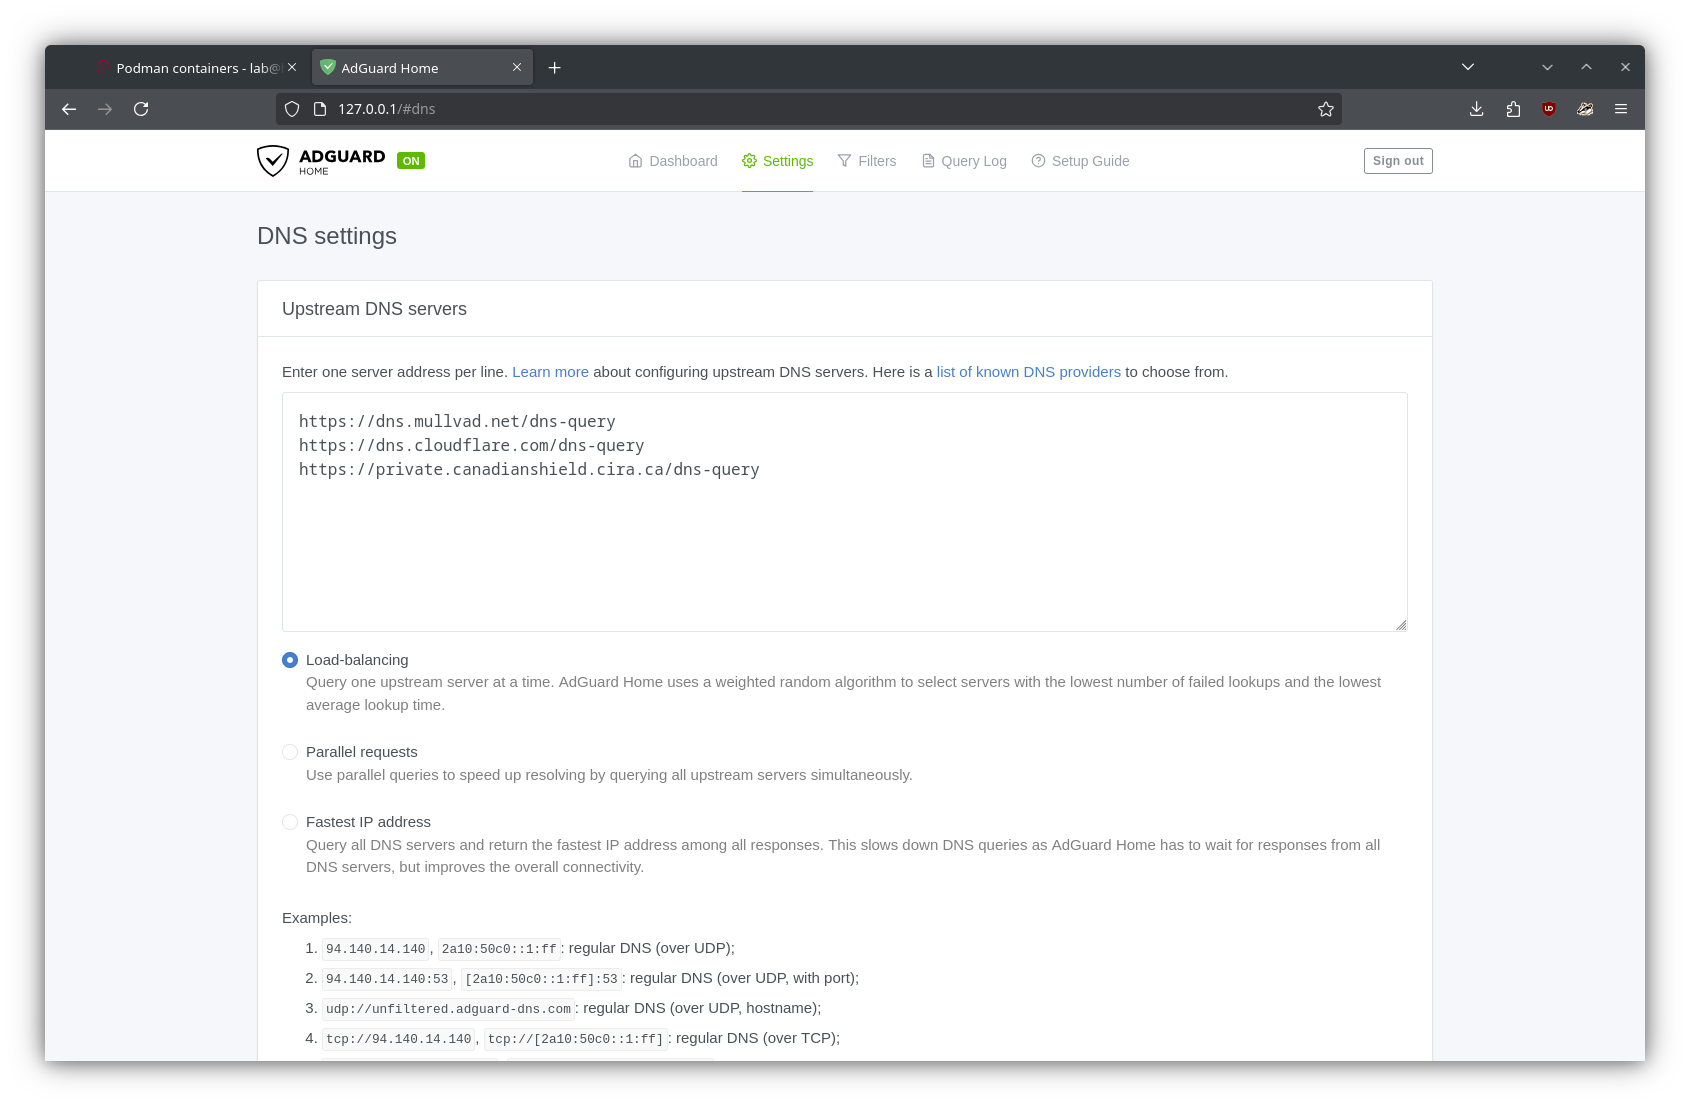
The first thing I changed was the upstream DNS provider(s); consulting AdGuard’s knowledge base, I replaced the default with a few providers, such as Mullvad and Cloudflare. I also set some backup providers, just in case.
 For now, I’ll be using the default filtering list, so no changes necessary there just yet.
Step 7: Using AdGuard network-wide
In order to get the benefits of network-wide ad/tracker-blocking, AdGuard must be configured as a DNS server on a router. The AdGuard UI has a “Setup Guide” has a straightforward explanation as to how this is achieved.
Note
Since AdGuard is running as a container, the guide will use the container’s IP address, not the host’s. Using the container’s IP address is useless since it is contained on the host machine. So instead, I used the IP address of the host running the AdGuard container.
Update
Since originally writing this, I’ve made a few changes that are worth mentioning:
- The
servicespod is no more. Instead, AdGuard runs as a standalone container adguardhomenow binds to port8080on the host rather than80- Superfluous port bindings were removed, leaving only
53:53,53:53/udp, and8080:80
Summary
In this post, I discussed how to setup AdGuard Home as a user container in Cockpit using Podman. The process isn’t perfect, but it can be improved using a reverse proxy (which I will hopefully demonstrate at a later date!).